How to get here. Click on the button that says Setup ![]() on the Main Menu, click on the button that says ‘Program Setup’ on the Configuration Menu.
on the Main Menu, click on the button that says ‘Program Setup’ on the Configuration Menu.
Company Setup Menu:
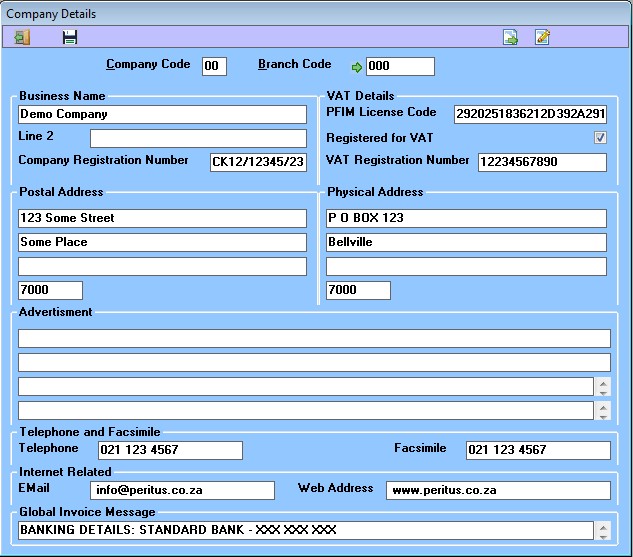
The Company Setup Screen is where details about your company are entered. Most of this information is printed on reports and identifies the set of accounts as belonging to this company.
Capture your details and move onto the next step.
This is the company code for the company you are presently configuring – to change this – login to a different company code.
This is the brach code for the branch you are presently configuring. For single branch installations this will typically be 000.
All details have to be setup for each branch.
NOTE: These fields can all be used on stationery like statement or invoice, if they do not appear on your stationery and you would like them to, please log the request with support (support@peritus.co.za) including which field and what report stationery.
The Accounts Tab:
How to get here from Company Setup screen, select Setup System Defaults and Options ![]() select the Accounts tab.
select the Accounts tab.

The Accounts Setup Screen is where you specify details about your accounting system and select system defaults and system settings.
You must specify the default account codes for the functions listed in the Accounting Defaults section. These settings enable the system to ensure that certain accounting practices are adhered to and assists the system in ensuring that the accounts balance. For example by specifying the deault Debtors Control account code – the system will ensure that every posting to a debtors account has a corresponding entry to the control account and thus ensures that the sum of the debtors accounts balances to the debtors control account in the General Ledger.
To select an account from a list double click in the field or press page down in the field or click the Item selector arrow  .
.
Before you can specify an account as a default account, the account must exist. See documentation for setting up the General Ledger .
Capture the necessary fields and click the save button  before moving on to the next step.
Default Debtors Control – This is the General Ledger account code that the system associates with all debtors transactions. In order to process journal or cashbook entries to a debtors account, this account must be specified first, the system will then allow the operator to select a debtors account in the sub account field. This system control ensures that the list of debtors always balances to the debtors control.
Default Creditors Control – This is the General Ledger account that the system associates with all creditors transactions. In order to process journal or cashbook entries to a creditors account, this account must be specified first, the system will then allow the operator to select a creditors account in the sub account field. This system control ensures that the list of creditors always balances to the creditors control.
Default Sales Account – this is the General Ledger account that will be posted to in the event of no sales account being specified for a stock item.
Default Purchases Account – this is the General Ledger account that will be posted to in the event of no purchase account being specified for a stock item.
Default Carriage Earned Account – this is the General Ledger account which will be posted to when a customer is charged for transport on an invoice.
Default Carriage Paid Account – this is the General Ledger account which will be posted to when transport is charged on a suppliers invoice.
Default Creditors Trade Discount Account – This is the General Ledger account that the system posts trade discount to by default. Trade discount is discount received from creditors on purchase invoices and credit notes. The system can be instructed to not post discount on invoices to trade discount but rather to deduct it from the specified purchase account.
Default Debtors Trade Discount Account – This is the General Ledger account that the system posts trade discount to by default. Trade discount is discount given to debtors on sales invoices and credit notes. The system can be instructed to not post discount on invoices to trade discount but rather to deduct it from the specified sales account.
Default VAT Input Account – this is the General Ledger account that is posted to by default when VAT is paid eg. when goods are bought.
Default VAT Output Account – this is the General Ledger account that is posted to by default when VAT is received. eg. when goods are sold.
Default Bank Account – This is the General Ledger account that the system posts bank related transactions by default. In most cases the default can be changed on a transaction by transaction basis. This default assists the operator in processing tranactions as they can accept the defaults setup by the system supervisor.
Default Debtors Settlement Discount Account – This is the General Ledger account that the system posts settlement discount to by default. Settlement discount is discount allowed to debtors on payment of accounts.
Default Creditors Settlement Discount Account – This is the General Ledger account that the system posts settlement discount to by default. Settlement discount is discount received from creditors on payment of accounts.
Default Retained Income Account – This is the General Ledger account that the system posts nett profit to when you close accounts for a financial year.
Date of End OF Financial Year – This is informational only based on current financial calendar.
Current Period – This is informational only, displaying the current financial period.
The System Tab:
How to get here from Company Setup screen, select Setup System Defaults and Options  select the System tab.

The System Setup Screen is where you specify details about your accounting system and select system defaults and system settings.
Debit Trade Discount Account – if this check box is checked then every time trade discount is given to a customer an entry is made to the specified trade discount account. If this check box is clear then the sale is recorded at the sales value net of any trade discount.
See also: Default Trade Discount Account on the Accounts Tab.
Show Transaction For Trade Discount – if this check box is checked then an entry will be recorded every time trade discount is allowed to a customer. If this entry is clear then the sale is recorded at the selling price net of discount.
If this check box is checked and the Debit Trade Discount Account check box is clear then the entry will be posted to the sales account concrened. If this check box is checked and the Debit Trade Discount Account check box is also checked then the entry will be posted to the specified Trade Discount Account .
Restirct Selling Price To Price List – if this check box is checked then the operators will not be allowed to sell goods at any price other than the price specified in the price list for the stock item concerned. The price list is entered into the Stock Master File.
Disallow Selling Goods Below Cost Price – if this check box is checked then the operators will not be allowed to sell items below the weighted cost figure contained in the Stock Master File of the item concerned.
Enforce Strict Branch Control – if this check box is checked then a transaction will not be able to be processed accross multiple branches.
Disallow Stock Issues into Negative Quantities – if this check box is checked then the system will not allow issues of stock items greater than the quantity in stock, unless the item is set as treat as non stock item.
Nett Off Debtors Aging – if this check box is checked then the system will deduct older credit balances from newer debit balances for customer aging.
Purchase Orders – Add User Name – if this check box is checked then the system will add the PFIM users name to the notes field.
Purchase Orders – Enable Control of State – if this check box is checked then System will manage the entire Purchase order process through all the stages 1 to 7, read the documentation specifically on this feature.
Purchase Orders – Force System Control of Sequence – if this check box is checked then System will prevent User from inerfering with allocation of PO Numbers.
In Setup Mode – if this check box is checked then the system prevents the processing of transactions, this is required when processing takeon data.
Print Creditors Invoices – if this check box is checked then the operators will be able to print a supplier Invoice on receiving goods.
Use Autoincrementing Journal References – if this check box is checked then the system will keep track of Journal references and Automatically incriment the counter.
Bill of Material / Manufacturing batch as 1 – if this check box is checked then this is a very complicated one contact support for assistance.
Save Print Selection Options – if this check box is checked then the system will remember what printer was used for what report on a per user basis.
Note: This also needs to be set on on a per user basis under user access.
Issues – Use Auto Incrementing References – if this check box is checked then the system will keep track of issue references and Automatically incriment the counter.
Invoice – Allow Invoicing Non Stock Items – if this check box is checked then the operator will be allowed to invoice items that are not stock or inventory items.
Invoice – Sales Reps Not Customer Specific – if this check box is checked then the operator will be able to specify a sales rep on a per invoice basis and not limit it to the customer master file selection.
Copy Details 3 From Quote to Jobcard – if this check box is checked then the system will transfer the Details3 from quote to jobcard when converting a quote to a Jobcard.
Markup Marks Up / Unchecked Calcs Margin – if this check box is checked then the system will use mark up to to calculate selling price.
Enable Serial Number Tracking – if you are licensed for this module and this check box is checked then the system will keep track of Serial Numbers including service jobs they are linked to and movements.
Enable per user database access – this setting is only needed if their are multiple conections to a MSAccess database from a single machine i.e. Terminal server.
Enable password protected database access – this setting is for MSAccess databases only and allows password protecting the database.
Use Long Stock Descriptions – this setting causes the system to use stock additional details description, in place of standard stock description.
Stock Branch Only – this setting is for van stock type branches where items are issued to jobs in branches other than the stock branch.
Enable Maximizer Intergration – this setting will cause jobs to integrate with a configured maximizer installation.